রবিবার, ৩১ মে, ২০১৫

How to make a Garment Sample

Garment Sample Development Process


Garment Sample: 
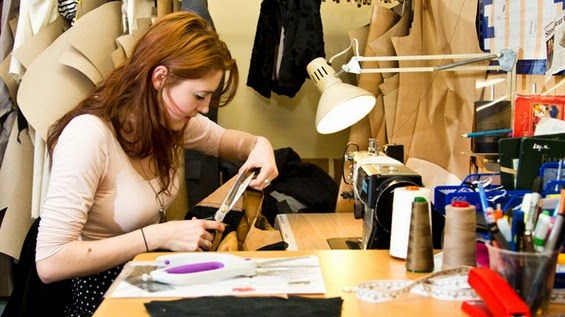
Garment samples are inevitably important and are developed tested before starting the bulk production. It means making a sample of the garment or fabric which requires to be sold. Sampling is one of the main processes in Garment Industry and it has a vital role in attracting buyers. Because the buyers generally places the order after they are satisfied with the quality of the samples.
 Garment Sample Development Process
 Garment Sample Development Process
The garment which is need for bulk production is called sample garments. According to specification sheet the sample which is approved by Buyer is called approved sample & the sample which is followed by approved sample is called counter sample. For smooth production it is necessary. Here two type of sample developing process are showing below.

Sample Developing Procedure:

1st sample:
The processes of 1stsample are given in bellow:
  • Receive spec sheet of garments from buyer.
  • Make pattern as per measurement.
  • Check the pattern which has made.
  • If necessary Check shrinkage, twisting, bowing before pattern makingCutting fabric as per pattern.
  • Collect accessories.
  • Start sewing.
  • M/C specified.
  • Check the sample to ensure it, ok.
  • Actual size required.
  • Actual fabric construction.
  • Send it to buyer for approval.
Development sample: 
After approving of 1stsample, the work of development sample is start. The process of Development sample is given in bellow.
  • Make pattern as per measurement, if buyer change the measurement to observe the counter sample.
  • Actual size required
  • Check the pattern which has made.
  • Collect actual color fabric. G.S.M should be ok.
  • Cutting fabric as per pattern.
  • Collect actual accessories.
  • Start sewing.
  • M/C specified.
  • Check the sample to ensure it, ok
  • Send it to buyer for approval 

শনিবার, ৩০ মে, ২০১৫

Buyer’s Inspection System in Brief


Inspection is the act of looking at something closely in order to learn more about it, to find problems, to see if rules are being followed and things are in their proper condition. Buyer Inspection System in garments sector is mainly divided into three. Some buyers maintain four Inspections which called Pre-final Inspection. It takes place before Final Inspection. Main Inspections are as below: 

1. Initial Inspection: 
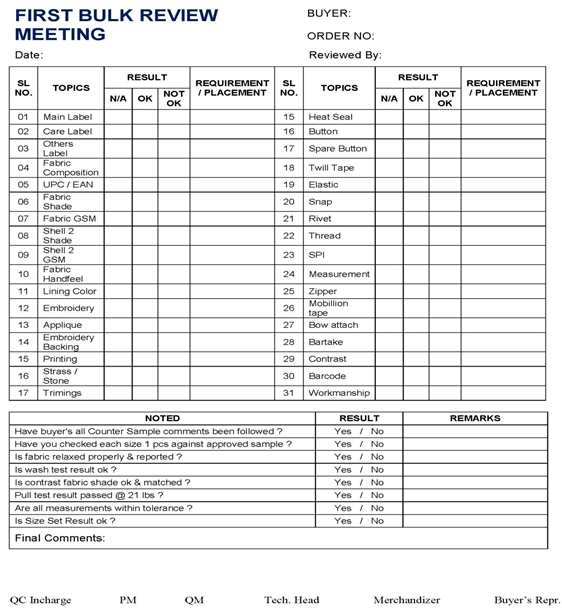
It’s very important for Quality Control Department to carry out Initial Inspection after first or trail cutting of 200 to 500 pieces covering all sizes & colors. It is to compare with approved sample & ensure to be conformance of requirements. It’s very important to get a smooth production as it’s the time to find out & solve the problems which may cause during production. A meeting can be held after this Inspection named First Bulk Review Meeting. See image of First Bulk Review Meeting below.

2. In-line Inspection: 
This Inspection is done during production. It can be performed several times depending quantity of ordered style / article. See image below for Inline Inspection Sheet.
Click on image for large size
3. Final Inspection: 
This inspection depends on AQL which means Acceptable Quality Level. Please note, during Inspection, defective goods are categorized as Critical, Major or Minor according to their importance to the customers. One critical defect can make us failure in result of Inspection, so, we all need be more sincere about defects.
  • Critical Defect is one that relates to a safety or legal problem, or a delivery error which prevents distribution of the product to the customer. 
  • Major defect is one that significantly affects the usefulness or attractiveness of the product, because it always results in a customer return and / or an immediate or later complaint. 
  • Minor defect is one which may not always be noticed by the user, and which doesn’t really affect the usefulness or attractiveness of the product.
See following image of Final Inspection Sheet.
Click on image for large size
Inspection Sampling Plans: 
During Final Inspection, we need sampling plans. There are several sampling plans available with 4 features that separate them from others. It’s quite not possible to describe in brief. We need read lots in books regarding Inspection Sampling Plans. These are:
  1. AQL (1.0, 1.5, 2.5, 4.0, 6.5)
  2. Type (Normal, Tightened, Reduced)
  3. Plan (Single, Double)
  4. Level (I, II, III)
The following Inspection Plan is in the most of Bangladeshi Factories.
  1. AQL = 2.5
  2. Type = Normal
  3. Plan = Single
  4. Level = II
See image below for your reference.
Click on image for large size
Few buyers don’t follow any AQL for their Inspection System. Instead of AQL, they follow percentage of defective goods in the Order. If any defect of product exceeds 3%, then the goods will be rechecked for those defects. 

See the sheet in image that few buyers use as Final Inspection Report based on percentage of defects.
Click on image for large size
During these inspections, various types of reports & records are seen & followed such as Quality Risk Assessment Report, Fabric Visual Inspection Report (4 Point System), Fabric Wash Test Report, Fabrics GSM, Spirality & Shrinkage Test Report, Fabric Relaxation Report, Lay & Marker Check Report, Cut Panel Measurement Report, Process Control Report (7 pieces), Traffic Light System, Hourly Q. C. Pass Production Report, Hourly Final Inspection Report by factory QC, Inline Inspection Report by factory QC, Pre-final Inspection Report, Pre-production Meeting Record, Loose Metal Control Register, Pull Test Record, Nickel & Ferrous Test Record, Shade-wise Country Plan & Shade Record, Hourly Internal Quality Audit, Corrective & Preventive Plan, Monthly Worker Training Program, Production Reporting & planning, Shipping Documentation etc. So, we can understand how difficult it is to explain in brief. One needs years to learn it. I just picked up a drop of water from sea. I’m learning & I suggest you to learn more & more. I added few Images here for references. If you need these images in other formats, please email me. Thank you.


Methods of Pattern Making


Pattern Making
Pattern making is a highly skilled technique which calls for technical ability, and a sensitivity to interpret a design with a practical understanding of garment construction. For successful dress designing pattern making forms the fundamental step. This function connects design to production by producing paper templates for all components such as cloth, hemming, fusible etc. which have to be cut for completing a specific garment. 

Pattern making is an art. It is the art of manipulating and shaping a flat piece of fabric to conform to one or more curves of the human figure. Pattern making is a bridge function between design and production. A sketch can be turned into a garment via a pattern which interprets the design in the form of the garment components. A pattern is flat while the body is not. The body has height, width and depth. Within this roughly cylindrical framework there are a series of secondary curves and bulges, which are of concern to the pattern maker. Darts are the basis of all pattern making. They convert the flat piece of cloth into a three dimensional form, which fits the bulges of the body. 

A pattern maker typically makes a pattern from a flat sketch with measurements or a two dimensional fashion illustration. The basic pattern is the very foundation upon which pattern making, fit and design are based. The basic pattern is the starting point for flat pattern designing. It is a simple pattern that fits the body with just enough ease for movement and comfort. 

Methods of Pattern Making 
Pattern making involves three methods- 
  1. Drafting
  2. Draping
  3. Flat paper pattern making
01. Drafting: It involves measurements derived from sizing systems or accurate measurements taken on a person, dress or body form. Measurements for chest, waist, hip and so on, and ease allowances are marked on paper and construction lines are drawn to complete the pattern. Drafting is used to create basic, foundation or design patterns. 

MEASUREMENTS 

Bust – measure just under the arms around the fullest part of chest. 

Waist – measure around narrowest part of torso. 

High Hip – measure 6 inches [15.5 cm] below waist around the hips. 

Back-waist length – measure from nape of neck to waist level 

Shoulder length – measure shoulder from ball socket to side of neck. 

Armhole depth – measure from nape of neck to under arm level. 

Back width – measure from armhole to armhole across shoulder blades. 

Neck – measure around base of neck. 

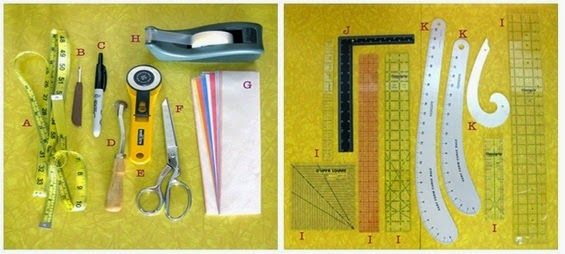
Tools use for Drafting 

A: Tape Measure 
This is likely something you already have in your stash, because if you have been making clothing you should have been measuring your body along the way! If not, pick up a good quality fiberglass tape measure today so you can start your pattern making off right with correct body measurements. 

B: Seam Ripper 
Like the tape measure, you probably have a seam ripper. You will use this in patternmaking for taking out your basting stitches when you move from the muslin fitting to the pattern drafting stage. 

C: Fine Point Sharpie Marker 
Muslin versions are always ugly because they are marked up, but you want to make your markings with a permanent and fine point. I like these push-button fine point sharpie pens as the cap always seems to get lost in my studio! These are quick and easy to use. 

D: Tracing Wheel 
To take your markings from the muslin stage to the patternmaking stage, this tool will pierce through the paper and leave behind marks to draft with a mechanical pencil. 

E: Rotary Cutter 
I like using my rotary cutter for the big broad strokes of cutting muslin. Make sure to use a cutting mat beneath your item to protect the cutting surface of the table underneath! 

F: Fabric Scissors 
Sharp, high-quality scissors are used for all your fabric cutting in sewing and patternmaking. These will shape the muslin down to the proper size after you have cut it big and broad with the rotary cutter. 

G: Tracing Paper 
I personally do not use this, but many designers like it for leaving marks behind on their muslins. I like a sharpie or tracing wheel, but try these sheets out and perhaps you will love them! Many people do. 

H: Scotch Tape 
It is inevitable that you will need to tape pattern pieces together and I find that basic Scotch tape is the best for this. 

I: Clear Rulers 
Having a variety of clear rulers in different shapes and sizes is essential in your kit for patternmaking. I like having a little one for marking in tiny areas, long ones for making marks for pin tucks, side seam lines, and other parts of the patternmaking process that call for something longer than average. I also have a quilting square with diagonal lines for helping square up corners and creating angles. 

J: Right Angle 
This is also a huge help in creating perfect 90 degree angles on your pattern. These are also available in clear plastic, which most people prefer. I have had this black one since art school and still use it. 

K: Curved Rulers
To shape arm holes, hip curves, hems and other lines that are not straight in patternmaking, it is essential that you have a few different curved rulers to get the proper slope in your pattern.
Tools use for Drafting
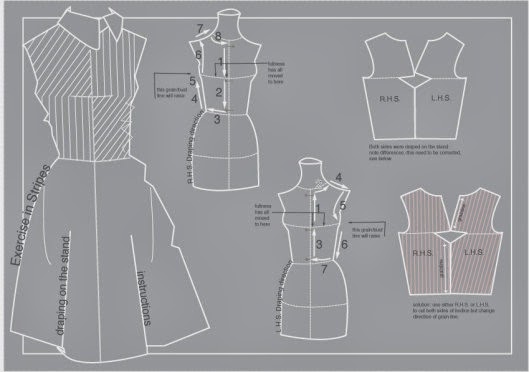
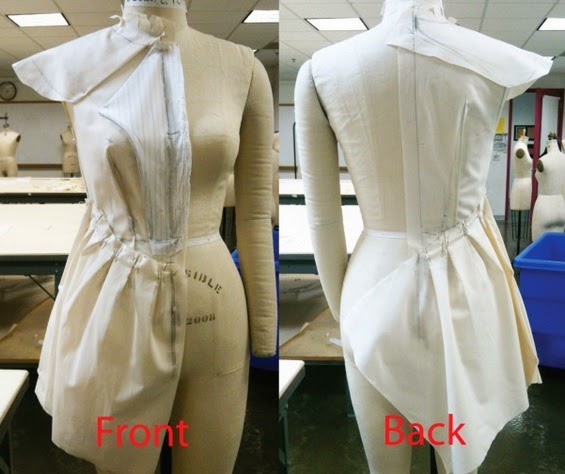
02. Draping: It involves the draping of a two dimensional piece of fabric around a form, conforming to its shape, creating a three-dimensional fabric pattern. Ease allowances for movement are added to make the garment comfortable to wear. Advantage of draping is that the designer can see the overall design effect of the finished garment on the body form before the garment piece is cut and sewn. However, it is more expensive and time consuming than flat pattern making. Draping can be made on a Human body or on a stand.
Add caption

03. Flat Pattern Making: It involves the development of a fitted basic pattern with comfort ease to fit a person or body form. A sloper is the starting point for flat pattern designing. It is a simple pattern that fits the body with just enough ease for movement and comfort. Five basic pattern pieces are used for women’s clothing. They include a snug-fitting bodice front and bodice back with darts and a basic neckline, a sleeve and a fitted skirt front and back with darts. However, as fashion changes frequently women’s styles fluctuate frequently. These basic slopers are then manipulated to create fashions. Nowadays draping is also tested by Computer aid techniques. A basic sloper has no seam allowances, which facilitates its manipulations to various styles. It has no design interest, only construction lines are marked on it. It is necessary that the basic structure of a sloper should be such that adjustments can be introduced easily. For a good pattern making, accurate measurements are of utmost importance.
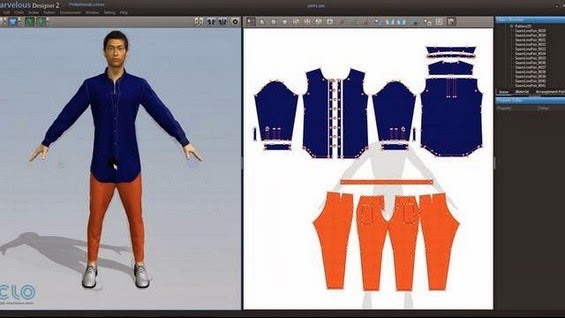
Pattern making by CAD system
The flat pattern making method is widely used in the ready-to-wear market because it is fast and accurate (Aldrich)